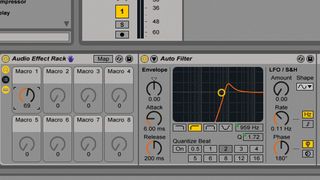
The modular world of Ableton Live's Racks provides a framework for creating custom instrument and effect combinations, using both Live's excellent native plugins and your own favourite third-party processors, within a single bracketed 'shell'. Think of each tool in your plugin list as a separate building block: once several are unified within a Rack, they form an entirely new device, its inner workings hidden under a deceptively simple interface.
Each left-to-right series of devices within a Rack is known as a 'chain'. A Rack can house an unlimited number of chains, accessed from the Rack's Chain List. Each chain receives the same input signal and sends it through its devices from left to right.
Each Rack also features a bank of eight user-definable Macro controls, each of which can span values of 0 to 127, or a range within that. Any parameter of any device within a Rack can be assigned to one of these eight rotaries, placing only the most essential controls at the forefront of your custom Rack. You can map unlimited plugin parameters spanning multiple devices to one encoder, then exert octopus-like control over them with just one knob to turn. By defining the minimum and maximum range of these mapping ranges, you can easily customise how the simple twist of a macro affects your multifarious assignment combinations.
And that's exactly what we're going to do now…
• For many more Ableton Live guides go to our massive learning hub: Learn Ableton Live and Ableton Push: music production tips and tutorials

Step 1: Let's dive into the world of Live's Racks by building a simple DJ-style filter effect. Load Clip.wav on a new audio track, head to Audio Effects in Live's Browser, and drop a new Audio Effect Rack on the channel. The empty rack invitingly asks us to 'Drop Audio Effects Here' - drag Live's Auto Filter over and drop it into this section, then change the filter type to a high-pass.

Step 2: Hit the Rack's Show/Hide Macro Controls button (top left) to display its eight macro knobs. To assign both our filter's frequency and resonance to the first macro knob, right-click the Auto Filter's Cutoff and select Map to Macro 1, then right-click the Resonance parameter and do the same. Sweep the macro knob - as the cutoff rises, the resonance increases too.

Step 3: When the macro is set to its minimum value, the filter still removes low end from the signal. We'd like to deactivate the filter completely when the knob is set to zero. To use the macro knob as an 'on/off' switch for the device, right-click the Auto Filter's Device Activator button and select Map to Macro 1. The device is now turned off when Macro 1 is within the first half of its range - not quite what we want.

Step 4: Toggle Macro Map Mode by hitting the Rack's Map button. We can now see the current active macros and the devices and parameters that are currently assigned, and adjust each mapped parameter's minimum and maximum range. Device On's Min range is set to 64, meaning the minimum point at which the filter is turned on will be at the knob's halfway point, midway between 0 and 127.

Step 5: If we change Device On's Min amount from 64 to 1, the Auto Filter will now be activated between macro values of 1 and 127. Sweep Macro 1 around and see what happens: when the knob is fully left (at a value of 0), the Auto Filter is turned off. As soon as the knob is increased, the filter turns on.

Step 6: We could stop there, but why not add more effects to the Rack? Head to the Audio Effects>Chorus browser menu and put the Resorus preset device immediately after the Auto Filter in the chain, keeping it within the Rack's 'bracketed' enclosure. Assign both its Dry/Wet and Delay 1 Time to Macro 1, then have fun filtering the beat. Hit the Save Preset icon to save your Rack.


