Over the past week, we've published a series of tutorials that cover the most essential, bread-and-butter synth patches in every aspiring synthesist's arsenal as part of our guide to the 15 synth patches every producer should know. Today, we take on two hugely useful sounds in one tutorial: synth strings and synth choir.
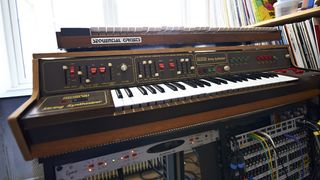
There’s something truly special about the sound of vintage string machines. Their sound has defined countless R&B, disco, and synthpop tracks. For disco and R&B, that list is endless, with the sound of the ARP Solina String Ensemble dominating songs from the Ohio Players, Rick James and Prince.

It’s possible to perfectly recreate the vintage sound with just a few elements: a narrow pulse wave, a pad-like amplifier, and a thick chorus/ensemble effect that can be replicated via stacking two or more choruses in series. For extra polish, you can add a high- and low-pass filter duo to more precisely dial in the limited frequency bandwidth of the originals.
Synth strings

We start with an analogue oscillator and select the pulse waveform. Since each vintage string machine had its own specific pulse width, experiment in the 5-20% range.
Once we have a thin, reedy sound, we create a second identical oscillator but raise its tuning by +12 semitones to create both ‘cellos’ and ‘violins’.

Vintage string synths had very little low- and high-frequency content, so we add in two filters after the oscillators.
One is set to low-pass with the cutoff to 6kHz. The other is a high-pass with the cutoff at around 200Hz. For the amp, we then create a pad volume envelope with full sustain, soft attack, and long release.

While pulse waves and pad envelopes serve as the basis for the sound, it doesn’t come to life until we add a proper ensemble effect.
While a single 3-tap chorus will do, to get even closer to the true vintage sound we add a second chorus after it, with slightly different settings.
Synth choir
Even vintage analogue synths can create decent, albeit artificial, vocal tones. A case in point is the legendary Theremin-like soprano with a touch of vibrato and glide.
Some instruments – such as the Roland VP-330 and Mellotron – have even become archetypes for choirs, appearing on countless tracks in a wide variety of genres, everything from synthwave to prog rock.
Formant filters are increasingly common in plugins and digital hardware, and their design can deliver compelling vowel sounds, but only if your oscillators and effects are approached with an understanding of several key sonic details for simulating the character of voices. Let’s take a look.

Starting with Serum’s Init preset, we select the Basic Mg wavetable and adjust the wavetable position for a warm sawtooth.
Since choirs are comprised of multiple voices, we use unison for a thick supersaw. If your CPU can handle it, select 10 voices with the detune parameter in the default position.

Formant filters are the secret sauce for creating vocal effects, so select one of the Formant filter types. Modes I and II work best.
Once you’ve selected a filter mode, lower your master volume and maximise the resonance to emphasise the vowel characteristics. Finally, sweep the cutoff in order to hear vowel options, like “aaaaah” and “oooooh”.

In a real human choir, there are minute pitch variations for each of the singers. Recreate this by assigning a Chaos modulator to the Unison detune parameter in very small amounts.
This is done in the matrix, by selecting Chaos 1 and assigning it to A UniDet. Then, experiment with adding drift within the supersaw. A generous amount of chorus and reverb finish off the sound.


